

Consequently, the finished product may be distorted, usually causing the floor to shift and then become disrupted when walking on. As a result, it is preferred to level the subfloor before installing laminate.
I will go into considerable detail about why you should not install laminate on an uneven floor. Evaluate the various materials that your subfloor may be made of, such as wooden floorboards, chipboard, and concrete.
So, to help you install laminate flooring over an uneven floor, this article will provide facts and explanations.
How Uneven Can A Floor Be For Laminate?
Many floors, especially in older homes, are uneven. It isn’t until you attempt to install a new floor cover that you realize how much the subfloor from underneath has warped or moved.
Some people may want to install their fresh laminate floors without first assessing the ground beneath them. But it’d be a bad idea!!
Any concrete or wood floor with significant gaps and plunges with a depth of more than 3/16 inches in either direction is considered an irregular floor for laminate flooring.
To look at it another way, if a floor is slightly irregular and has gaps, but the depth of the lumps and gaps is less than or equal to 3/16 inches within a 10-foot radius, the floor can be considered a flat floor for laminate.
Most manufacturers and professional laminate floor installers recommend this measurement. This measurement is also consistent and applicable to most flooring types.
As a result, if someone needs to implement laminate flooring on such an irregular floor, he must first repair the hills and valleys.
Can Laminate Be Installed On An Uneven Floor?
Laminate flooring can be implemented over uneven floors. However, before installing the planks on the floor, you must first lay down interlocking sheets.
These interlocking sheets are referred to as subfloors, and they are not connected to the ground. These sheets are not sticking to the subfloor; rather, they rest on top.
These sheets, after placement, provide a fairly flat or even subfloor for laminate flooring to be placed over.
Uneven floors must be leveled before installing laminate flooring. Any flaws that are not properly addressed before laying your laminate floor will not be allowed to be corrected until the laminate flooring has been lifted and will most likely need to be replaced.
As a result, if you leave the floor uneven before laying the laminate, you will have numerous problems with the quality of your laminate flooring.
The majority of uneven floors are caused by slumps and bumps in the subfloor caused by movement and warping over time. As a result, uneven floors are more common in older homes.
The floor may be flat on one side but slanted on the other. It is also a serious problem caused by structural issues with the house. Furthermore, structural issues are more difficult to resolve and may necessitate professional assistance.
If you don’t check the levels of the subfloor or don’t realize it’s uneven, you risk damaging your new laminate floor as it starts to settle over the uneven surface.
As a result, it is best to adjust any uneven areas on your floor before applying laminate over the top.
How To Repair/Level An Uneven Laminate Floor?
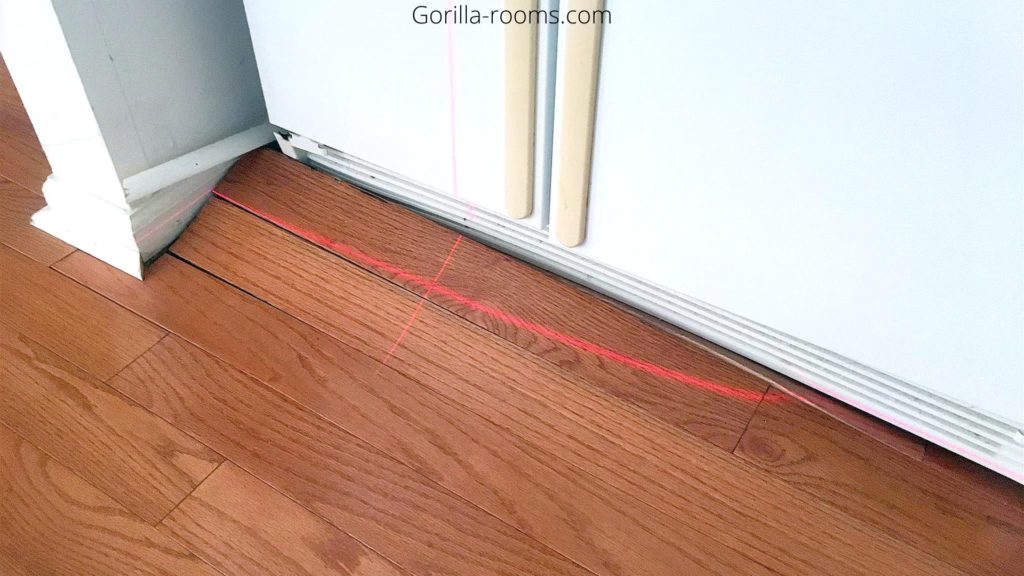
The first step in repairing your floor is to locate the dips and bumps. The spirit level is used for this. Slowly, move the level all over your floor and see if there are any areas where the bubble within shifts.
You could also choose one of the laminate floorboards. Place the board on the subfloor on its side.
Make sure the entire length of the board is in contact with the ground. If not, you won’t be able to see which areas are raised which have dipped.
The leveling of an uneven floor varies depending on the type of subfloor you have. I’ll go over the procedure for each type.
How Do You Install Laminate On An Uneven Floor?
To begin assessing the subfloor’s quality, you should first start by removing any current flooring installed directly.
To see if the floor is even, find a long level, or a straight pipe will do, and lay that along the floor.
If the subfloor doesn’t touch the level or the pipe evenly along its entire length, there are areas of the floor that require repair. Mark these problem areas as you work your way across the floor to evaluate the entire floor.
It is worth noting that a laminate floor can be installed on a flat floor, but not necessarily level.
The issues arise only when the floor is not linear, and bumps or dips in the subfloor can be felt or seen.
Laminate floors can be installed over small flaws, but any notches or buckling larger than 3/16 of an inch must be repaired.
Before laying laminate on an uneven floor, there are a few things to consider. Before attempting to level the floor and lay your laminate, you need to have the proper tools and prepare the area.
Step-by-Step Instructions for Laying Laminate On Uneven Wooden Floorboards
In my experience, floorboards are prone to breaking and are commonly found in older homes. Even though hardwood flooring is rarely replaced due to the high cost, uneven surfaces are common.
Step-by-step instructions are provided below for your convenience. As a result, you can lay laminate flooring on an uneven floor.
Tools Needed
Vacuum cleaner: This will remove dirt and dust from the subfloor. You could use a regular household vacuum, but please remember that any loose staples, nails, or wood chips could cause it to become damaged.
Carpenter’s level: Also referred to as a spirit level. This is a tool used to determine whether or not a surface is a level. It contains liquid in one or more tubes, each with a small air bubble. The bubble will rest in the center of the tube if the level is placed on level ground.
Plywood or Hardwood: Order the appropriate quantity of hardwood or plywood depending on the size of your room, taking into account any potential waste.
Tape Measure: A simple tape measure that will assist you in planning and cutting your plywood or hardwood to the proper sizes.
Straight Edge: A straight edge is used to plan your cuts before making them.
Electric Drill / Driver (If Using Plywood): We strongly recommend screwing the plywood into the wood subfloor if laying a plywood floor. Some people suggest nails, but we think screws are far superior.
Stapler (If using hardwood): While nails can be used, a staple gun will help you finish the job much faster. We have suggested a low-cost staple gun to complete the project to the required standard.
Staples (If using hardwood): You’ll need staples if you buy a staple gun.
Stanley Knife (If Using Hardwood): Hardwood can be cut with a sharp Stanley knife; we will discuss how to do this later in the article.
Screws (if using plywood): Use self-countersinking screws to secure your plywood. These screws are simple to install and ensure that your plywood is securely fastened to the floorboards.
Circular Saw (If Using Plywood): A circular saw will assist you in accurately cutting the long straight edges of the plywood. You can, of course, use a handsaw instead if you prefer.
Jigsaw: Making those crucial curved and intricate cuts will necessitate the use of a Jigsaw. Cut the intricate shapes created with the profile gauge with the jigsaw. It can also be used for straight cuts (with a thicker blade), but a circular saw is preferable.
Profile Gauge: A profile gauge will assist you in making intricate cuts by profiling curves with steel needles.
Sandpaper: Sandpaper can be used on wood subfloors if there are only minor bumps on the floor. Sandpaper with a grit of 80-120 should be used.
Hammer: Make sure you have a claw hammer. You will be able to remove your nails easily as a result.
Finishing Nails: These are long nails that, if used, secure your laminate or wood in place. You can also use nails to secure any loose floorboards beneath the laminate.
Workbench: Using a workbench is far more convenient than making all of your cuts on the floor. A good workbench should be large enough to rest your plywood or hardwood planks while cutting comfortably.
Knee Pads: A pair of knee pads will help make it easier. Because you will be kneeling on the floor for long periods, going to invest in some good knee pads will allow you to complete your work much faster, safer, and with less pain. After you’ve gathered the necessary tools, the following steps will be taken:
1- Protect Your Floorboards
The first step in evaluating your floor should be to ensure that all of your floorboards are secure.
Walk around the room, paying close attention to squeaking and underfoot movement. If you notice any movement or noises in the floorboards, try to fix them by screwing them in (do not nail them).
You must now secure the loose-up boards or boards that make a squeaky sound to the joists beneath with 1-3/4 inch nails or screws.
If you discover any stray nails, simply pull them out or hammer them back into place with a hammer.
If your flooring is only uneven due to a single plank or a small number of planks that have risen above the rest of the flooring, probably replace these instead of declaring your entire floor uneven. In some situations, an electric sander can assist you in correcting minor flaws.
2- Choosing The Best Subfloor Repair Method
After securing your floorboards, check to see how uneven your subfloor surface is still. If the floor is slightly uneven, you should consider covering it with thin hardwood (3mm or 1/8 inch).
Likewise, for subfloors that need a high correction level, we will cover the floorboards with 12″ or, preferably, 5/8″ plywood.
If the floor slants from one side of the room to the other, you should contact a professional because this is most likely a structural issue.
Assuming that the problem can be solved with either hardwood or plywood, refer to the measurements of your room and order the hardwood or plywood you will need. See my ordering tips for the wood sheets below.
3- Purchasing Hardwood or Plywood For Your New Subfloor (Tips)
When ordering hardwood or plywood to level out your subfloor, the size of the wood (as well as the thickness) should be considered.
As a general rule, larger sheets of wood (whether hardwood or plywood) are preferable. The larger the wood sheets used, the fewer joints required; additionally, The more floorboards a sheet covers, the more gradually the uneven floor will be ironed out.
Of course, transportation will be a factor to consider when ordering these sheets of wood, as longer sheets will be more difficult to transport.
When looking for sheets of hardwood or plywood, we recommend checking out the larger DIY chains because they often have a large stock and will therefore deliver or make the collection process as simple as possible.
4- Plywood Or Hardwood Preparation
You’ll want to get started as soon as you have your hardwood or plywood, other equipment, and tools.
The first step will be to clear your floor of any excess dirt and dust that may have accumulated.
Lay as many sheets (unfixed) on the floor as you can and walk over the top of them to get a general idea of how even the floor will be once laid.
If this test shows that the boards will iron out the uneven distribution of the floor, you are ready to proceed.
5- Allowing Your Wood To Acclimate
To begin, you’ll want to acclimate your wood to the room. This is done to ensure that they do not expand or shrink after being laid; otherwise, you may end up with gaps, or your boards may warp in the worst-case scenario.
Hardwood
Hardwood can be acclimatized relatively quickly, but it also necessitates more effort than simply placing them in the room where it’ll be installed.
Unpack the hardwood boards and scrub water into the hard side of the boards with a scrubbing brush. Therefore, the sheets should be laid out in the room where they will be made to fit for at least 24 hours before being used.
When stalking the sheets, keep the rough side (west side) should be, facing each other to avoid getting the smooth side of the sheets wet.
Your sheets will be ready to place after 24 hours.
Plywood
Unfortunately, this is not a quick process, as your boards should be left (within packaging) in the room you intend to use them in for about 2 weeks before laying them.
It is critical to keep the room as it will be during this time after the sheets are laid.
Ensure that the temperature remains constant with the normal temperature variations (night and day) that are likely to occur once the boards are in place.
6- Skirting Board Removal
Whether you want to remove the skirting boards before installing your laminate flooring is up to you.
You’ll have to add some beading around the room if you don’t. Removing the skirting and reinstalling it after the laminate has been installed is the preferred method because it looks better and provides a far outstanding finish than using beading.
It is also important to keep in mind that the floor will be raised because you have chosen to use hardwood or plywood to establish a new subfloor.
So it stands to reason that the skirting boards should be raised as well. We recommend removing your skirting boards without causing serious harm.
7- Locate Higher/Lower Points
Locate the areas higher or lower than the surrounding surface using a carpenter’s level.
8- Level Out The High Points
Sand down all of the higher spots you’ve discovered on a wooden floor with a hand sander. Sand until the surface is level with the rest of the surface.
9- Vacuum The floor
You must thoroughly vacuum the floor, leaving no dust or debris behind.
10- Allow The flooring Planks To Acclimate.
Place the flooring planks in the room where they’ll be installed for 48 hours to allow them to acclimate to the temperature.
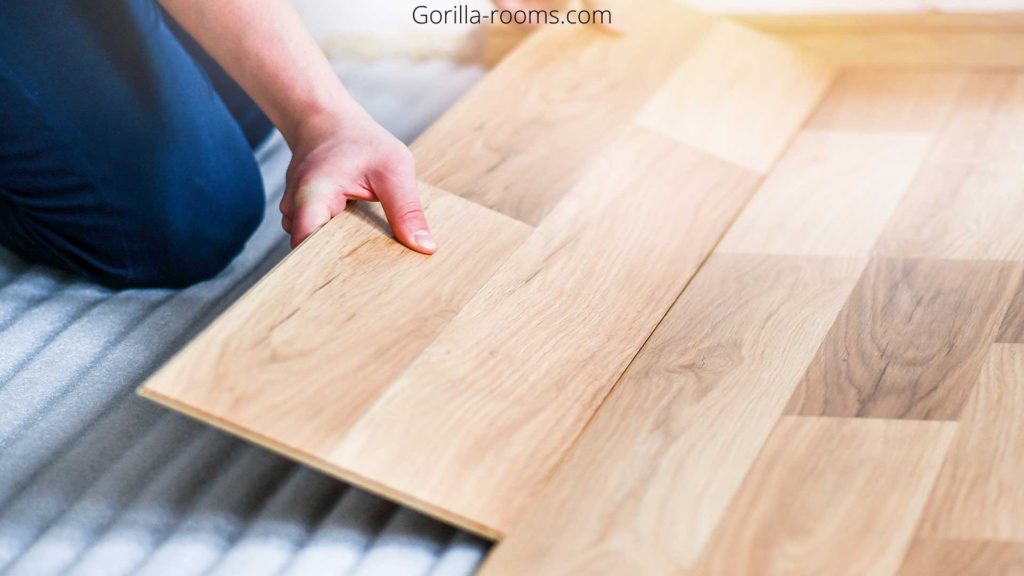
11- Place The Laminate Planks On The Floor.
Place the planks perpendicular to the walls from the doorway to the back of the room, keeping the required expansion gap in mind. That is how the first row is installed against the corner wall.
Make sure the planks’ tongues face the wall and the grooves face out. Snap the tongues of the second-row planks into the grooves of the first row planks.
Continue to stagger the boards as you add more planks. The joints shouldn’t be more than 12 inches apart. And resize the boards by cutting the edges.
But, if the laminate flooring planks you’ve chosen don’t already have underlayment installed, you’ll need to lay down underlayment sheets. After preparing and drying your uneven floor, install an underlayment.
Putting Down A Hardwood Subfloor
We will repair the hardwood with a heavy-duty stapler or ring shank nails. Both should be sufficient to complete the task.
The hardboard should be laid smooth side up, with as many floorboards as possible covered. We will not attempt to attach these boards to the joists; instead, we will attach each board to the floorboards at 15 cm intervals.
Once your first piece of hardwood has been laid and attached (the corner of the room is fine), simply butt the second board up firmly against the first sheet and attach it. Try to keep the boards as nicely aligned as possible.
Working your way across the room, stagger the joints between successive rows until you only need to cut some hardwood for the final gap.
To cut the hardboard easily, use a steel ruler and a retractable knife (Stanley knife) to score the hardboard at the point you want to cut.
Turn the board over, place the steel ruler over the scored line, and bend the board. You can now make your final cut with the retractable knife.
Putting Down A Plywood Subfloor
Installing a plywood subfloor is arguably the best way to ensure that your laminate flooring (or virtually any other flooring you wish to lay) is installed to the highest possible standard.
The primary issue with plywood is the time taken to acclimate and the extra time required to fit the plywood properly.
You should have already checked that your floorboards are safe or that there are no protruding screws or nails that will interfere with installing the plywood. Remove your skirting boards as well.
Place your first piece of plywood in a tight corner of the room. However, as many floorboards as possible should be covered with plywood.
We will secure the plywood to the foundational floorboards rather than the joists by screwing every 15 cm along the edges of the wood.
We’ll also secure at 15 cm across the center of the board. These screws should secure the plywood to the floorboards but not penetrate them.
Firmly fit the second piece of ply, preserving the boards as cleanly aligned as possible and adjusting as you go along the room.
Straight cuts can be made with a handsaw, but cuts around pipes and other non-straight edges will most likely require a profile gauge and jigsaw.
Once you’ve finished covering the entire floor, you’ll be ready to install your laminate, though you may need to cut your doors due to the height difference caused by the plywood layer.
Step-by-Step Instructions For Laying Laminate On Uneven Concrete
Concrete subfloors are evaluated and repaired in the same way wood subfloors are. If there are only a few high spots, use an angle grinder with a cup-wheel attachment for concrete to level them out.
No matter how well-poured, concrete floors frequently have high and low spots, making them difficult to cover with tile or hardwood.
You could physically level the floor by grinding down high points and filling in low points with mortar, but even then, there will be slight variations in floor height.
Pouring an overlay of the self-leveling compound is best to create a level surface.
The tools and thorough process for applying the compound mix to the floor to level it are listed below.
Tools Needed
Self-leveling Compound Mix: Self-Leveling Underlayment is used to level floors before installing ceramic tile, natural stone, resilient flooring, carpet, wood, and other floor coverings. This quick-setting underlayment can be applied to a thickness of 1.5 in. (3.8 cm) in a single pour.
Primer: This primer and sealer seals porous surfaces and improves underlayment bonding.
Flooring Trowel: A basic flooring trowel for smoothing out edges.
Mixing Paddle: A mixing paddle that will assist you in achieving the desired consistency of the self-leveling compound mix.
Bucket: A bucket in which to mix your mixture.
Vacuum Cleaner: This will remove dirt and dust from the subfloor. You could use a regular household vacuum, but please remember that any loose staples, nails, or wood chips could cause it to become damaged.
Carpenter’s Level: Also referred to as a spirit level. This is a tool used to determine whether or not a surface is a level. It contains liquid in one or more tubes, each with a small air bubble. The bubble will sit in the center of the tube if the level is placed on level ground.
Wide Putty Knife: A wide putty knife is a broad, blunt, and somewhat flexible knife used to smooth thick material across a surface. In this case, it is used to even out the leveling compound or to spread a minimal quantity over a small dip in the floor.
Protective Glasses: Wear protective eyewear and a respirator because there will be a lot of concrete dust, which is dangerous if inhaled.
1- Clean Your Floor With A Vacuum Cleaner.
Begin by ensuring that your floor is tidy and that any debris has been swept up to prevent anything from becoming entangled in the mixture (once poured).
2- Remove Any Gunks Or Adhesives From The Floor.
If you have a concrete floor, you should first locate any areas that have existing adhesives, cement, or concrete. First, scrape away any existing mortars or gunk.
3- Determine Higher/Lower Areas
Place your long level across the floor to identify high/low areas, plunges/dips, or bumps.
4- Grind The High Points
Then, using a concrete grinder, grind down the high areas and remove bumps until the surface is even with the surrounding surface.
5- Prepare The Self-leveling Compound Mix
You’ll have to prime the concrete floor (the perfect primer to work with our recommended self-leveling mix).
Whichever self-leveling compound mixture you select will provide additional guidance on what to use and how to use it. Follow the manufacturer’s instructions.
Fill a large bucket halfway with the amount of water required by the leveler manufacturer’s instructions.
Use an electric drill fitted with a paddle bit to mix the leveler into the bucket of water thoroughly. After thoroughly mixing the leveler, add the last water over two minutes to smooth out the texture.
Pour the compound onto the floor after mixing it according to the instructions (consider using a mixing paddle). The compound will eventually settle to its level.
6- Using The Self-Leveling Compound Mix:
Pour the leveler onto the hard slab and spread the combination with a squeegee to a depth of about 1/4 inch.
Continue mixing compounds and pouring in different areas until your floor is completely covered.
Ensure that the leveling compound has dried before laying the laminate flooring over the fixed subfloor.
However, if there is only a minor dip in the concrete, you may prefer to fill in that area simply. After you’ve poured the mixture over the dip, smooth it out with a wide putty knife.
It is good to ease out any lumpy areas with a flooring trowel. Work as rapidly as feasible because the flooring compound will harden quickly.
7- Fill In Any Low Spots/Gaps
Fill in low areas and gaps/plunges with leveling compound. Feather the edges as well. Allow the compound to dry.
You must wait for the leveling compound to cure, which takes about 24 hours. After that, you should recheck the levels for peace of mind, but you should have a self-leveled floor to collaborate with.
8- Examine The Subflooring Level
Once you’ve made sure that your subfloor is as even as possible, you’ll be ready to begin installing your laminate flooring.
Fixing a subfloor leveling problem can take a long time, but the extra effort will pay off, and your finished floor will look like it was laid by a professional.
Before laying any type of flooring, always address any leveling issues. The extra effort will be rewarded. There is no worse feeling than being reminded daily of a DIY project that you understand you could have done better.
Finally, install the laminate planks the same way we did the wooden floors.
Should Laminate Be Installed On An Uneven Floor?
Laminate should not be managed to install on an uneven floor. This will decrease the finished product’s quality and waste your time.
However, laminate is typically supplied with underlay, compensating for any minor variations.
You really shouldn’t lay laminate until the floor has been leveled if there are bumps or dips larger than 3/16 of an inch in size.
Installing laminate on an uneven floor will cause the laminate to settle into uneven surfaces. This will have an impact on the final product’s quality.
The subfloor dips will create an air gap beneath the boards, causing laminate floors to pop and creak under your feet.
This may also cause damage to the interlocking mechanism that connects each laminate board, resulting in gaps between them.
Uneven ground can also cause your new laminate to warp and lift. This may be just enough to cause a trip or to begin wearing away the edges of the boards.
Nothing restricts you from putting in a new laminate floor on an uneven floor, but even so, the poor quality of the final product would be insufficient to justify the expense.
Irregular floors can be effortlessly leveled with the right tools. So there’s no reason left for giving it a try.
What Happens If Laminate Is Installed On An Uneven Floor?
When installing laminate flooring on an uneven floor, clasping between the planks and loosening of the bars occurs as the floor settles in the new installation.
Furthermore, an uneven laminate floor produces creaking and squeaking noises. Because the surface is uneven, there are voids filled with air.
Whenever anyone steps on the floor, the upper flooring becomes pressurized and collides with the air pockets, resulting in a popping sound.
Is Underlayment Beneficial For Uneven Floors?
Underlayment is one of the most crucial elements to consider when installing flooring over an existing floor, especially if it is uneven.
Underlayment over an uneven floor creates a flat surface for the flooring planks that are about to be installed. Underlayment protects the flooring planks by supporting them and preventing them from being damaged prematurely.
What Is The Best Laminate Underlayment For A Slanted Floor?
Because of its heavy-weight structure, Super Velvet is considered the greatest laminate underlay for an uneven floor.
As a result of its heavy-weight construction, the underlayment will sit nicely on uneven flooring. And will not allow any bumps, gaps, or plunges to be felt by the laminate planks. It will smooth out the surface of the floating planks.
Which Laminate Flooring Is Best For Uneven Floors?
The best laminate flooring for uneven floors is 4 feet long, 3 inches wide, and 7mm-12mm thick laminate planks.
Thicker laminate flooring planks aid in covering up uneven floors. Pergo Timber Craft+ Wet Protect Laminate Flooring is the best option for uneven floors.
When the dips/bumps in your floor are more than 3/16 deep with a radius of 10 feet, consider it an uneven laminate floor. As a result, before installing laminate flooring, always ensure that it is level.